


House Painters Are Skilled Professionals Who Transform Your Home’s Surfaces
House Painters Anchorage are skilled professionals who transform your home’s surfaces. From surface preparation to high-quality paints, a professional painting job will last you for years to come.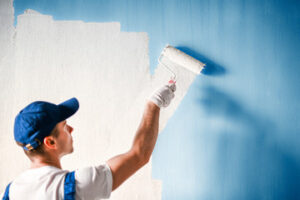
In addition to a professional look, painting your home can provide health benefits by minimizing allergens like dust, pollen, and pet dander. Read on to learn more about why you should consider hiring a professional house painter.
Painting a home is not easy, it takes time and if done incorrectly can lead to costly repairs down the line. Hiring a professional will ensure that your home is painted the correct way and will protect your investment for years to come. There are many things to consider when choosing a painter, including insurance, price and expertise. It is also important to choose a house painter that will be happy to answer any questions you may have about their services.
A house painter is a tradesperson that is responsible for the painting and decorating of residential buildings, such as apartments, houses and condos. The tradesperson should have extensive knowledge and experience in interior and exterior wall painting and related specialized finishes such as wallpaper and faux paint. They are also required to understand the various construction materials and the impact of environmental factors on the longevity of paint and other related products.
The quality of the finished work is a reflection of the craftsmanship. A professional house painter will always strive for superior workmanship, taking the time to do it right the first time. They also take the extra step to prepare the surface before painting, which is a vital part of the process that many do-it-yourselfers overlook.
They are also familiar with a variety of wall surfaces, and know how to prepare them properly for paint application. In addition, they will use only the highest quality paints and related products to achieve the results you expect.
Some house painters will offer additional services such as deck sealing and coating, pressure washing and wood refinishing. These additional services can add value to your home and prolong the life of your existing deck or fence.
It is possible to save money by hiring a do-it-yourselfer, however there are many benefits of a professional house painter. The bottom line is that they will do the job better, faster and leave your home looking beautiful for a lot less than it would cost to do it yourself. Plus you will have more time to spend on other priorities.
Aesthetics
A well-executed house painting project is more than simply slapping paint on walls. It requires extensive preparation, careful coordination and attention to detail. It should also leave a home with an attractive appearance and add to its overall value. A professional house painter can help you achieve the desired result by applying proper techniques, and using high-quality materials that will withstand the test of time.
House painters can also offer recommendations on paint colors and finishes that will enhance your home’s exterior or interior. Their expertise can help you create a color scheme that suits your taste and fits in perfectly with the surrounding neighborhood. They can also advise you on the best type of paint to use, including interior and exterior, so that it will last for a long time.
When choosing a house painter, it is important to find one with experience and good references. They should also be licensed and insured in your state. In addition, make sure they provide a written estimate that includes the cost of labor and materials. This will prevent any unexpected expenses from cropping up later on.
In the case of exterior house painting, it is recommended to get at least three bids from various companies. Compare their quotes and determine whether they include costs for pressure washing and caulking, as these are often overlooked in the initial estimate. Lastly, make sure the company offers a warranty and provides contact information for past clients.
Unlike many other household projects, house painting can be a difficult and messy endeavor. It requires the right equipment, as well as a certain level of physical strength and manual dexterity. It is a good idea to wear protective clothing, such as work pants and a hat, when working with paint. Moreover, a house painter should be comfortable working with caulk, putty, plaster, stain and varnish. These materials emit strong odors and are often messy.
Aside from adding curb appeal to your property, regular house painting can protect it from the elements and prevent mold and mildew growth. Furthermore, it can help keep your home energy efficient by blocking heat and cold from entering through the walls.
Walls in Need of Repair
Painting your home is a project that can take a considerable amount of time and effort to complete. For homeowners who don’t have the time or equipment to do the job on their own, hiring a house painter can be the best option. Professional painters are skilled in their craft and have the knowledge and tools to get the job done right. They can help you achieve a beautiful, high-quality finish that will improve the aesthetics of your home and increase its value.
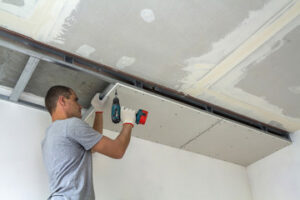
In addition to offering superior craftsmanship, house painters can also provide wall repair services. This is an important part of their service, as it helps ensure that the new paint will adhere properly and won’t chip or peel in the future. It’s crucial to have any damage repaired prior to painting, as it will save you time and money in the long run.
A skilled house painter can use a variety of techniques and materials to repair surface damage, including filling in cracks with putty or plaster, smoothing uneven areas with sandpaper, and repairing small holes with joint compound. They can also sand down rough patches and prime the area before applying the new coat of paint.
They can also handle more extensive wall repairs, such as drywall damage. Drywall is a common material in homes, and it can be vulnerable to various types of damage. If left unaddressed, it can lead to an unattractive appearance and even structural issues. House painters are familiar with the most common types of wall damage and can quickly and efficiently repair it.
If you’re considering hiring a house painter, be sure to ask them about their skills and experience. It’s also a good idea to review their pricing and estimate before making a decision. Make sure you understand the costs of labor, materials, and paint, and ask about any additional services they may offer, such as pressure washing or caulking. This will allow you to compare prices and choose the best house painter for your needs.
Time Saving
One of the most important aspects of a good painting job is doing the prep work before starting to paint. Taking the time to clean the area, repair small cracks and holes and sanding smooth should all be done before beginning to reduce wasted painting efforts. A professional house painter will know how to do these things, so they can get started right away and save you a lot of hassle and headache down the line.
If you are hiring someone to paint an entire room or the exterior of your home, be sure that the estimate outlines the exact cost and time frame of the job. It is not uncommon for painters to lump a few different costs together in an estimate, so ask if they can break it down for you to see exactly what your money is buying. You also want to make sure that the final estimate includes the color you want, any special finishes and any other details specific to your job that might affect the cost.
The best way to find a professional house painter is to get referrals from friends and family members. This is an effective way to avoid having to do all of the research yourself, and it will help you narrow down your choices so that you can choose the best contractor for the job. Another option is to use a review site, such as Angie’s List or Yelp. These sites allow you to read other people’s reviews of contractors, doctors and just about any service provider you can think of, so they can be a great way to find a reliable company.
While professional house painters will take care to cover and protect your furniture, carpets and other belongings from getting wet or damaged during the painting process, it’s best to remove as many items as possible before they arrive. This will save you the trouble of moving them back once the painting is finished and also ensure that your walls receive an even coat of paint.
If you have pets, it is best to ask a friend to watch them for the day while your home is being painted. This will give you peace of mind that your pets are not in danger while the painting crew is working at your home.
How to Inspire Happiness in Painters
Painters In West Chester PA is an art that requires a high level of skill. It also helps painters develop their imagination and creativity. Creating beautiful artwork inspires happiness in painters and gives them the confidence to continue their work.
Painters must be good at manual dexterity and balance to work on ladders and scaffolding. They must be knowledgeable about different kinds of materials and their use.

Nurturing your creativity is a key part of becoming a better painter. This can be done in various ways, such as by practicing meditation or spending time outdoors. Try taking photos of interesting objects or places to inspire your creativity. Taking a local art studio or online painting academy class can also help you improve your creative skills by learning new techniques and expanding your knowledge base.
In addition to experimenting with different art mediums, painters can enhance their creative skills by planning their paintings. This can help them avoid common mistakes and save time. For example, planning out their colors can help them avoid muddying the colors and maintain consistency in their work. They can also plan out the layers in their paintings, which can add depth and realism to their artwork.
Another way that painters can develop their creative skills is by reading books about art or attending workshops. This can give them an idea of how other artists approach their work and help them develop their style. Additionally, observing their work can help them identify what they are doing well and where to improve.
Painting can be a complex process that requires a lot of practice to master it. However, there are some things that every painter can do to enhance their creative skills and make their work more visually appealing. Some of these include planning their paintings in advance, observing their subjects closely, and analyzing their work. The most successful painters continuously improve their work and never abandon their dreams.
Many people think that painting is just about improving one’s creative skills but also instigates the development of critical thinking and problem-solving abilities. To produce an amazing piece of art, a painter has to come up with multiple solutions for any challenge they might face while painting. This is a very important skill that can be useful in various situations in life.
Many painters use their paintings as a form of expression for the emotions they are going through or have gone through. This is why some therapists recommend painting and drawing for their patients to express themselves. By telling their feelings through art, a painter can understand them better and control them more.
The painting also improves a person’s emotional intelligence, allowing them to interact with others and develop the ability to communicate with others and share their good moods, making them happier. This positive attitude towards life helps them maintain a healthy lifestyle and live longer.
Even if an individual isn’t skilled at painting, he can still learn the techniques over time. Research has shown that people who paint and draw improve their fine motor skills. This is because every time they pick up a brush, they exercise their muscles and create new neural connections in the brain. This enables them to perform daily tasks such as typing, cooking, and tying their shoes. These improvements also help to reduce stress levels, leading to a healthier life.
The art experience teaches people to observe the world more intensely and study it closely. This is an essential skill for any job requiring you to look at a complex problem, consider multiple interpretations, and make a reasoned decision. Critical thinking is particularly important for employment in research, education, law, management, and medicine.
The creative process of painting helps improve a person’s ability to think critically about the world. This is because a painter must learn to interpret and analyze the subject of their paintings. They must also think of creative ways to solve problems and overcome challenges. Many studies show that students who take part in art programs develop stronger critical thinking skills than those who do not.
In addition to improving their artistic talents, painters enhance their problem-solving abilities. This is because painting often involves overcoming challenges outside a person’s comfort zone. For example, a painter might have to deal with color constraints or unexpected results that occur during the creative execution of their paintings. This is why a painter’s ability to think strategically and outside the box becomes second nature.
Although many people assume that painting only enhances creative skills, it encourages critical thinking as well. This is because a painter must develop an ability to analyze the situation and resist gut impulses. They also have to study the work of others, compare it to their own, and come up with a rational conclusion.
Creating visually appealing artwork that others enjoy is a rewarding experience for any painter. It builds their self-esteem to know that others value their work. This feeling of accomplishment helps them maintain healthy self-esteem levels, which is necessary for any artist to stay motivated and keep pushing through the ups and downs of the creative process.
Painting stimulates creativity, inspires new ideas, and is a great way to explore different artistic styles and techniques. It also allows artists to let their imaginations run wild, which can be helpful for those who struggle to express themselves verbally. This can increase emotional intelligence as painters gain insight into their own emotions and what contributes to varying moods and stress levels.
In addition to stimulating the mind, painting improves cognitive function by increasing spatial awareness and fine motor skills. This is particularly helpful for older adults who may be at risk of developing memory loss illnesses like dementia and Alzheimer’s Disease. Painting requires the brain to make complex decisions, such as what color to use and how to apply it to the canvas. This can help boost mental acuity and help individuals think critically when making decisions in other aspects of their lives, like problem-solving and planning.
In a world of negativity, having a positive outlook on life and being happy is important. It is common for people to have high and low points in their lives, but chronic low self-esteem can be harmful. It is a challenge for some people to open up to others, especially when they feel they do not have much worth. Artwork allows them to communicate their thoughts and feelings without words and gives them the ability to show their personality and unique perspective.
Generally, people who paint report more happiness than those who don’t. This is because of the positive psychological and mental benefits that painting provides. It is also a form of exercise that increases the release of happiness hormones, making people healthier. This is why some even consider art as a form of therapy.
Painting allows individuals to express themselves without words and build a unique connection with their environment. This can be a great benefit for people who suffer from depression or anxiety. As a hobby, it gives them something to look forward to each day and provides them with a sense of fulfillment.
As painters practice and advance their skills, they feel accomplished in their work. This is similar to the joy felt by a person who achieves a promotion at their job or a dancer who performs for an audience. The sense of fulfillment from the completion of a piece of artwork is enough to make a person happy.
In addition, painters enjoy the aesthetic nature of their work. It brings a sense of beauty to their home and helps them feel more relaxed. There is a growing movement in healthcare to provide art in hospitals, as it has been shown to improve the well-being of patients. This is because it can take people out of the humdrum, hamster-in-a-wheel part of their brain and into the more creative, empathy, and happiness-producing parts of it. It is also a good way to relieve pain, especially in the hands. People with atrophied hands have been shown to recover through the transcendental bliss found in art creation.
What Does it Take to Be a Painter?
Bunbury Painters is an art that requires years of dedication and hard work. You need to learn about pigments, binders, and painting surfaces. You also need to know about artistic styles and techniques.
In addition to learning about a painter’s background, you should copy old masterworks for study and practice. This will help you develop your skills and improve your ability to describe a painting.
Painters showcase their creative talent through brush strokes and applying pigments to a canvas. They are also skilled in blending and layering colors to achieve their desired effect. They use their skills to create unique works of art that are appreciated by the public and collectors. Many painters are formally trained in art schools; others learn through apprenticeships. Some painters work with a team of other artists to create large-scale murals or commissioned artwork. Others work in their studios to develop their style and refine their craft.
The practice of painting has a rich and diverse history, and it continues to be a popular medium for contemporary artists. Modern art has moved away from traditional techniques and values in favor of concepts, but many artists continue to practice this tradition. Fans believe some famous painters for their unique perspective and prodigious skill. In contrast, others have left an extensive legacy of influential works that will be remembered for generations.
Throughout history, cultural traditions—of tribes, religions, guilds, and royal courts—have controlled paintings’ form, subject matter, and imagery. These traditions influenced the style and approach of painters, and the artists themselves were afforded social status and a close—if not always amicable—relationship with their patrons.
The majority of painters work in their studios, which are typically located in commercial or residential spaces. Studios provide painters with a comfortable space to work and often contain easels, work tables, and storage for their tools and supplies. Some painters also utilize digital platforms to create and share their art with an online audience. These platforms are a great way to promote and sell artwork and can be a valuable source of income for aspiring painters. Painters may also work on-site to prepare surfaces and apply coatings to buildings, equipment, and structures. These jobs can be physically demanding and require a lot of bending, kneeling, and climbing. Some painters may also need to wear safety gear, such as self-contained suits when working in confined spaces or operating abrasive blasters.
Creating art requires various artistic techniques, styles, and mediums. Painters combine these skills to create a visually pleasing and engaging result. For example, they may incorporate a variety of brushwork and compositional elements to convey emotions, moods, and narratives in their paintings.
The process of creating a painting begins with conceptualization and planning. Painters must consider their artwork’s desired subject matter, style, and color palette. They must also determine the dimensions of the canvas and any other required materials. They may also research to inform their work. For example, they might look for images of historical or contemporary subjects to inspire their work.
Artists can use various types of painting media, including oil, acrylic, and water-based paints. They can also employ different application methods, such as glazing, impasto, and washes. Some painters work alla prima, meaning they complete the entire piece in one session, while others take multiple sessions to finish a painting.
Many painters prefer to work in a studio, which provides them with a controlled environment to concentrate on their painting and store art supplies. Some studios are in private homes or rented spaces, while others are part of artist collectives. Studios usually include easels, work tables, and storage areas for art supplies.
Painters can also work in a natural setting, such as a park or scenic landscape. This method of painting, called plein air, allows them to observe and capture the colors and lighting of their outdoor environment. This technique also allows painters to explore new methods and styles, which may change how they perceive their surroundings.
Paintings can be used to communicate ideas and experiences, as well as to evoke positive emotions and enhance well-being. Whether a painting is displayed in a gallery, museum, or personal collection, it can enrich people’s lives and inspire creativity. It also provides a means of communication that transcends language barriers and can be understood by people from diverse cultural backgrounds.
In the past, painters often had patronage support and could exhibit their work in public venues like museums and art galleries. As the demand for their artwork grew, painters began to earn their livings through art sales and commissions. Today, painters can reach an audience through online galleries and art exhibitions.
Painting is a skilled trade that requires patience, attention to detail, and physical stamina. It is also a highly creative and challenging profession. In addition, painters must possess excellent customer service skills because they often interact with clients to help them select paint colors and application techniques. They may also be responsible for completing touchups and coordinating large painting projects.
Some painters specialize in a particular type of art, such as oil or acrylic paintings, or they may prefer working with specific materials, such as paper, canvas, or wood. Painters work in various settings, including commercial and industrial buildings, homes, and churches. They can also choose to work from a studio, which is a space where they create and store their artwork. This can be a rented studio or a home studio.
Before applying paint, a surface must be thoroughly cleaned to remove any grease or grime that can prevent the bonding of the paint. This cleaning process typically involves washing with trisodium phosphate cleaner, scraping or sanding, and then applying a primer or sealer. Painters use various tools to apply the paint, including brushes, rollers, and spray guns. They may also utilize multiple finishing techniques, such as sponging, ragging, or layering.
Many painters learn their trade on the job, but some pursue formal training in painting and decorating at a community college or vocational school. They then participate in a three-year apprenticeship, which includes on-the-job training and technical instruction. After completing the apprenticeship, they can receive a journeyperson certificate. In addition, some painters can become certified in certain provinces and territories after passing an interprovincial exam.
While the employment outlook for painters is slow, some industries are experiencing growth, such as in the construction sector. Therefore, the career is a good choice for those with a high school diploma and willing to take on long-term on-the-job training. Painters must also complete additional safety training to work with scaffolding and harnesses. To be a painter, you should also have a high degree of stamina, as the job requires bending, kneeling, and reaching in uncomfortable positions.
Painting is an incredibly creative and skilled profession requiring high critical thinking and problem-solving skills. Painters think conceptually to bring multiple solutions to life, and it may be necessary to adjust their original vision based on color limitations or unexpected outcomes during artistic implementation. These problems are a part of the learning process and teach painters to be flexible, which is a key aspect of this career. Painting also requires a high degree of fine motor skills, which can be developed through training programs that teach the basics of hand-eye coordination. This helps painters better control their tools and produce more precise work.
Painters are also required to prepare their materials before starting a project. This includes choosing the appropriate type of paint, swatching and mixing colors, and preparing the surface for painting. They are also responsible for removing old paint and may need to apply several coats of paint to achieve the desired color or finish. Painters use various tools and techniques, including brushes, palette knives, and spray paint.
The final goal of painting is to convey emotions, ideas, and narratives. This is done through compositional elements, brushwork, and color choices that create symbolism or evoke certain moods. Painters can pursue various genres, such as landscape, still life, and portraiture. They may also be interested in abstract or contemporary art.
Professional painters often have their own studio space to create artwork. This may be a private room in their home, a separate rented space, or an artist collective. The space should be large enough to accommodate their workspace, storage, and equipment. It should also be well-lit and comfortable.
Aside from their studio, painters build relationships with curators, gallery owners, and potential buyers. They may participate in open-call exhibitions or attend local art events to show their work to the public. They also may sell their paintings through online platforms and art markets.
Unlike higher education jobs, a painting career is cheaper than a college degree. Apprenticeships and on-the-job training allow painters to earn while they learn, which can help them save money and get a head start on their careers.
How to Design a Concrete Driveway
Concrete is a functional material that lends itself to a wide variety of design options. Its versatile appearance and low maintenance make it a preferred paving choice for many homeowners.
Unlike asphalt driveways that use non-renewable petroleum supplies, concrete pavements are made from natural resources, including water, rock, sand, and cement, which can include recycled or waste materials such as fly ash, ground blast furnace slag, or silica fume. For professional assistance, contact Concrete Contractors Colorado Springs.
Concrete is used to build the world around us, including homes and driveways. It’s an extremely durable material, and it can withstand more traffic than other paving materials, such as asphalt and gravel.
A concrete driveway can last up to 50 years or more with regular maintenance and care. However, if the wrong type of concrete is installed or it’s exposed to harsh weather conditions, the life of a concrete driveway may be significantly shorter.
When a concrete driveway is constructed, it’s often mixed with other materials like limestone, steel mesh, or rebar to reduce the chance of premature cracking. It’s also usually poured over a subgrade of crushed rock or gravel to increase its strength and durability.
Unlike pavers, which can break or shift over time, a concrete driveway will stay in place because it’s not made of individual pieces. It’s also much cooler under the blazing summer sun and easier to clear of snow in the winter.
Concrete slabs can be poured to a thickness of 10 or 12 inches, and they’re usually reinforced with wire or rebar to make them stronger and more resistant to damage. They can also be textured to create a unique look for the surface.
Some common problems that can affect the durability of a concrete driveway include natural settling and water damage. If a driveway is installed on a slope, it’s important to correct the drainage to prevent moisture from pooling underneath the slabs. It’s also crucial to use a high-quality penetrating sealer on the concrete once a year to protect it from dirt, mold, and mildew.
Stress cracks are another common issue that can occur on a concrete driveway. These cracks are typically caused by temperature changes, heavy loads, or soil movement. Filling in these cracks is a simple process that doesn’t impact the structural integrity of the concrete.
Appearance
The driveway is one of the first things people see when approaching your home, and it’s an opportunity to make a statement. Whether you want to spruce up your driveway to complement your home’s aesthetic or boost its resale value, there are several design options that can transform the surface into something eye-catching.
Concrete is an excellent material for a driveway, especially when it is combined with aggregate like gravel. The texture of the aggregate and the smoothness of the concrete create a visual and tactile contrast that many homeowners find attractive. Unlike asphalt, this type of concrete driveway is long-lasting and doesn’t require frequent resurfacing.
Another way to add visual appeal to a concrete driveway is by etching or stamping it with a pattern before it sets. This is often done with new concrete, but it can also be used to enhance an existing driveway. A popular choice is a herringbone pattern that adds interest to an otherwise plain concrete surface. Other patterns that are commonly seen on concrete driveways include geometric shapes, a basket weave, and hexagons.
In addition to etching and stamping, you can also use colors to alter the look of your concrete. A common color scheme is two shades of gray or tan, but you can experiment with different combinations to find the perfect match for your home. Another option is to use concrete stain to give the concrete a natural, mottled appearance.
If you are looking for a more rustic charm, consider adding cobblestones to your concrete driveway. These stones are a classic addition to any landscape and offer both durability and old-world elegance. Unlike their natural counterparts, which are prone to shifting, concrete cobblestones are long-lasting and easy to maintain.
While it is possible for a homeowner to pour their own concrete, this is usually a job left to professionals who have the equipment and experience necessary to get the project done quickly. A professional crew can usually complete the excavation, form preparation, and concrete pour in a day or two. The poured concrete will then need to set for a few days before it can be leveled and finished.
Easy Maintenance
Concrete is a reliable and durable paving solution that adds value to your home. It is low-maintenance but should be sealed regularly to protect against weather damage and staining from oil and other fluids. Consult with local concrete driveway specialists to find out more about this trusted paving option and how you can bring your dream driveway design to life.
Mark uses a Brute Bosch jackhammer to break up the old concrete, then compacts the base soil and gravel with a Wacker Neuson VP1340 plate compactor. He then adds a layer of tack cloth, followed by a strip of mesh wire, to reinforce the concrete. Mark and Britt then use an edging tool to smooth and shape the edges of the concrete. They finish by adding a brushed texture, which looks more natural and helps with skid resistance.
When they are ready to pour the concrete, Mark and Britt mix the materials together using a power mixer. They then follow the template they created with a straight edge to create the correct size and shape for the concrete. Once the concrete has a smooth surface, they pour it and level it. They let the concrete set for two days, then they could start driving on it. After 28 days, they should apply a sealer to the concrete to keep it protected.
Regularly cleaning the concrete with a hose and scrub brush will help keep it in good condition. Concrete sealer will also help protect the concrete from harsh winter weather and chemicals used in snow removal, like road salts.
Keeping trees and large bushes far enough away from your concrete driveway will reduce the risk of roots growing under the slab and causing cracks. It is also a good idea to clean out the gutters frequently so that water doesn’t flow down the driveway and freeze. This can cause the concrete to expand and crack over time. Using a concrete patching kit to fill in cracks and holes will also protect the concrete from further deterioration. To ensure the longevity of your concrete driveway, make sure to have it filled in as soon as the cracks appear and seal it every two years to protect it from oxidation.
Value
Concrete is a durable, long-lasting material that adds significant value to your home. If you have an old, cracked, or deteriorating asphalt driveway, replacing it with a new concrete one will make your house stand out in the neighborhood and likely increase its resale value. Concrete is also a practical option for your driveway if you have a large vehicle, such as an RV or trailer. In addition to being more durable, a concrete driveway is easier on tires and less prone to punctures than an asphalt one.
Concrete contractors can work with you to find creative visual design options for your concrete driveway, adding unique curb appeal that enhances the beauty of your property and home. However, a plain gray concrete driveway is a tried-and-true choice and remains a budget-friendly option.
The cost of building a new concrete driveway depends on several factors, including its size and shape, site preparation, and labor costs. A curved driveway will cost more to build than a rectangular or square option, and a contractor may have to specially build concrete forms for this type of project. In addition, a poured concrete driveway requires a proper sub-base that will be graded and compacted to provide strength and stability.
A reputable contractor will take the time to prepare the site for a concrete driveway by removing existing materials and ensuring that the soil is properly graded and compacted. This will ensure that the concrete is well bonded to the ground, creating a strong and long-lasting surface.
Concrete is a natural material that will last longer than asphalt, saving you money on future repairs and replacements. In addition, a concrete driveway will not be susceptible to the same damage as an asphalt one, such as cracking, distortion, or disintegration due to UV exposure and weather conditions. It also uses less energy, as it doesn’t have to be heated and melted like an asphalt driveway. As a result, it reduces carbon emissions and energy consumption in your home. To further conserve energy, a concrete driveway reflects more light than an asphalt surface, further reducing your home’s need for lighting.
Is the Multiple Income Funnel a Scam?
Mack Mills is an executive film producer, entrepreneur & top affiliate marketer. His program promises to help people make money online & start earning commissions on auto-pilot.
However, like many get-rich-quick schemes, is Multiple Income Funnel Scam or not? Those who join it will only lose money, making the people who recruited them richer.
How Does It Work?
If you’ve seen ads on YouTube and Facebook about multiple income funnel, then you’ve probably wondered if it’s a scam. But if you dig deeper, you’ll find that the program is actually legit and it does work for some people. But there’s a catch. If you want to make money with the program, you’ll need to recruit others to join it. That’s why many people consider it a pyramid scheme.

The program is designed to help people make money online without working on it daily. It works by allowing members to promote their done-for-you websites and earn affiliate commissions on each sale they make. The program also offers training and support to help members get started.
Mack Mills is the creator of multiple income funnel and claims to have built a six-figure online business using the system. He has even been featured on a number of popular YouTube videos. But despite his claims, there are some major red flags to watch out for with this program.
First, there’s no way to join the program without a sponsor. This is a huge red flag and should be a big turn off for any potential customer. You’ll need to find a sponsor through YouTube, Facebook, or other social media channels. Typically, the sponsors will have videos explaining how they’ve made money with the program and will provide an affiliate link that you can use to join.
Once you sign up, you’ll receive a member’s area with a number of different done-for-you websites and landing pages. You’ll then need to drive traffic to these pages and convince others to join the program. This is where the pyramid scheme comes in because you’ll be making money on the sales of other members, not on your own.
While it’s true that some people have been able to make money with the program, most of them lose thousands of dollars. If you’re looking for a legitimate way to make money online, I recommend checking out my blog post on how to make money blogging. There are plenty of tips and tricks that will help you get started.
Does It Really Work?
It’s a scam, plain and simple. These “done for you” programs only make money for the creators and not you. They use overhyped claims to lure you in, but they’re just empty promises. They want you to believe that making money online is easy, but the truth is it takes hard work and dedication.
The website for Multiple Income Funnel doesn’t give any information about the creator, Mack Mills, so it’s difficult to trust this program. It also doesn’t have a refund policy, so you’re at risk of losing your money if you join. In addition, the site recommends a number of shady programs that are actually pyramid schemes. These schemes are illegal and often require a huge amount of money to join. In fact, only about 1% of people who participate in pyramid schemes actually make any money at all.
These schemes require you to recruit other people to join the program. In return, you get a commission on their sales. Eventually, the number of people you recruit grows and you can earn more money. However, this is not a sustainable business model. In the long run, it’s impossible to keep up with the ever-increasing number of recruits. And eventually, the people who recruited you will start to lose their money. That’s why these schemes are so dangerous. They’re guaranteed to produce more losers than winners.
In addition to the pyramid scheme, the program also promotes other scams. One of these is OPM Wealth, a credit repair scam. This is another type of pyramid scheme where you pay for services that are supposed to improve your credit score and then recruit other people to sign up for the service. In this case, you earn a commission on the first two sales and then give the third to the person who recruited you. This type of business is illegal and you’ll likely be exposed to government action if you promote it.
Multiple Income Funnel is a scam because it offers no real value to its members. Its only purpose is to get you to invest in shady programs that are actually pyramid scams. In addition, the program is not automated, so you won’t earn commissions on auto-pilot.
Is It a Scam?
Whether you’re looking for passive income or a full-time job, online work can be very lucrative. But it takes hard work and dedication to achieve your goals. Unfortunately, many people get ripped off by scams and get-rich-quick schemes. These scams promise to pay you back tenfold if you invest your money in them. But more often than not, these programs don’t deliver. Many people end up losing thousands or even millions of dollars.
Multiple Income Funnel is one of those get-rich-quick schemes. It promises to make you rich by recruiting others into the program. The problem is, this type of scheme is illegal and can cause you serious financial problems. There are other ways to make money online without having to recruit others.
If you’re considering joining Multiple Income Funnel, be sure to research the company and the people behind it. You’ll also want to read reviews of other people who have used the system. There are a lot of scams out there, so it’s important to be cautious and do your homework before spending your money.
In addition, Multiple Income Funnel is a pyramid scheme, which is a form of business that involves selling low-quality products or services in exchange for recruiting new members. The problem is that the people at the top of the pyramid keep all the money while the rest lose their investment. It’s also a dangerous business model because it can lead to massive debt and bankruptcy.
Mack Mills, the creator of Multiple Income Funnel, is a notorious scammer who has been involved in several other fraudulent online programs. He is also known for using fake testimonials to promote his products. In addition, he has been caught lying to people about his earnings in the past. He is a cigar-smoking con artist who has been making millions of dollars off of people.
Although Mack Mills has some talent as a marketer, he’s not a legit businessman. He doesn’t care about his customers; he only cares about making money. He makes unrealistic and overhyped claims to lure people into his pyramid scheme. In addition, he doesn’t provide any proof that his program works.
Final Words
Mack Mills is a legitimate business owner and his products have worked for many people. He also spends thousands of dollars testing and perfecting his funnels to make sure they convert. If you decide to try Multiple Income Funnel, make sure to start with the smallest package first to test out the system. Also, don’t listen to bloggers who call every business opportunity a scam. They are usually Wealth Affiliate members and are trying to give Mack a bad name.
As for the Multiple Income Funnel scam, it is definitely a Ponzi scheme. It works by allowing users to purchase already-done-for-you systems that they then use to drive traffic to and earn commissions from. While this is not the worst type of program, it is still not something you should get involved with. Instead, focus on promoting affiliate marketing programs that actually bring value to your audience. You can learn more about how to do this by checking out our article on the Best Affiliate Marketing Courses.
Gel Coat Repair Basics
With a little time and know-how, gel coat can be repaired easily to look as good as new. Start by finding an area of the hull identical in color to the damaged gelcoat and using it as your mixing palette. Decant enough plain white pigment to complete the repair onto the palette. This article covers some of the most common gel coat repair problems and how to fix them.
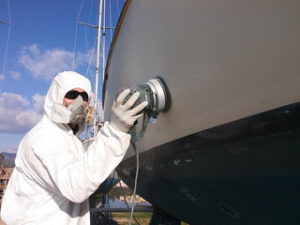 Impacts with hard objects like winch handles or downrigger weights often scratch the gel coat. The damage can be repaired by washing, sanding and polishing with rubbing compound to restore the gloss of the damaged area. However, some deeper gouges and scratches require structural fiberglass repair or filler before reapplying the gel coat.
A basic gelcoat kit will contain everything you need to repair a shallow scratch or gouge on your boat’s hull, deck or other surfaces. The kit will include the correct gelcoat base and catalyst ratio, plus pigments to match your boat’s color. The kit will also have a plastic spreader and a putty knife. Remove any loose flakes or fragments before starting to repair the scratch or gouge and clean the surface with acetone. Then, tape off the affected area with masking tape and a small section around it to protect it from any accidental spills or splashes.
Select a part of the hull that is identical in color to the damaged area to use as your mixing palette. This will allow you to better color-match the gel coat later. Then, sand the affected area with 1,000-grit sandpaper to smooth and remove scratches, chalking and other imperfections.
Once the sanding is complete, wipe down the area and clean it with acetone to remove any remaining traces of dirt or grease on the hull surface. Then, using the plastic spreader and a putty blade, work the gelcoat paste into the scratch, making sure that it is fully filled and leaves no air pockets behind. The paste will bulge a little behind the plastic spreader; this is normal because polyester resin shrinks slightly when it cures.
Once the gelcoat paste sets (cure), you can leave it as is; the scratches are sealed, the under layer fiberglass is protected and it looks good. But if you’re not satisfied, you can further buff the area with rubbing compound to make it shine like new.
Deeper scratches and gouges must be filled with resin and epoxy-based filler instead of polyester. These products are more expensive but adhere better and last longer than polyester fillers. Once filled, they need to be sanded and cleaned before you can apply gelcoat or boat paint.
From rope chafing on coamings to the occasional bump from a dock or trailer, gelcoat chips are an unavoidable part of owning a boat. These areas can be restored to look like new and help protect the fiberglass hull from damage in the future. It’s a good idea to repair these imperfections as soon as possible, not only to improve your boat’s appearance but also because it will extend the life of the underlying laminate. The key to successfully repairing gelcoat damage is less about specific skills than preparation and process.
It’s important to keep your work area and spray equipment free of contamination to ensure that the gelcoat is cured properly. Moisture, oil and dirt can cause the gel coat to peel or crack. In addition, the correct ratio of catalyst to resin needs to be used in order to cure properly. Using too much or not enough of either will result in the gel coat drying too fast or not curing at all.
Gelcoat is a thicker material than paint which provides added protection to your boat hull from scratches and chips. This protective layer is usually applied at the factory, but it does eventually wear away over time. Wholesale Marine carries a full line of gelcoat repair products from Fiberglass Evercoat and Hi-Bond, including both liquid and paste gelcoat.
When repairing a chip or scratch it is important to use the proper filler and resin. Gelcoat paste is fine for a quick fill that hides the scratch or chip, but it can easily crack around the edges due to too much shrinking and may have pin holes showing after polishing. Using gelcoat resin and a proper filler will result in a more solid filled repair that will blend into the existing surface.
A common mistake people make when repairing a crack or chip is adding too much resin which will result in a thicker than normal strip that will pull away from the glass and eventually delaminate. This can be avoided by sanding the area before applying the resin to ensure that you have a smooth surface.
While most scratches and chips result from impacts with hard objects (winch handles, downrigger weights, 15-pound lobsters) cracks in gel coat are usually a sign of an underlying structural problem. It’s important to understand how cracks form and how to repair them properly.
Cracks in gelcoat can be caused by exposure to chemicals, water damage or even just the natural aging process. Using a proper repair technique and taking the time to prep the area is essential. It’s also important to use a quality epoxy or polyester and to ensure you have the correct application equipment and a clean work area.
A good repair begins with thoroughly washing the area to remove any dirt and oils. Tape off sensitive areas to avoid gelcoat spatter or accidental sanding. Then wet sand the area with 220 grit sandpaper to create a shallow bevel and then wipe down with acetone. This will remove any surface contamination and give the new gelcoat a solid base to bond with.
It’s recommended to apply a few coats of gelcoat in order to get the best finish. Leave 15-20 minutes between each coat to allow the gelcoat to dry. It is important to mix the right amount of catalyst with the gelcoat and to work swiftly. Once the gelcoat has catalyzed you have only about 10 minutes to work before it starts to harden.
If you’re repairing cracks, it’s important to be aware of the direction of the crack as well as the depth of the crack. This will help you determine which direction to repair the crack. If you’re unsure, we recommend hiring an experienced fiberglass and gelcoat technician to assist you.
To help prevent further cracking, we recommend adding a layer of Durabak to your gelcoat following the repair. This is a heavy-duty marine-grade fiberglass fabric that adds strength, resilience and protects against impact.
Dull gel coat surfaces can often be restored with proper sanding and polishing compounds to bring back the shine. This is also a great way to repair pinholes which can happen when the gelcoat is not cured properly. This can be a sign of improper sanding or insufficient catalyst being added.
Before you apply gelcoat to a cracked surface, you have to thoroughly wet-sand the whole area. This ensures that you will be working with a completely smooth surface and minimizes the likelihood of “fisheyes” (abnormal bumps) or cracks in the final coat of gelcoat.
This step also removes any waxes or other contaminants that could interfere with the bond between the damaged area and the new gelcoat. When wet-sanding, use a finer grit than you would normally use on a dry sandpaper. 320 or 400 grit wet paper works well for this step. Use a bucket of clean water to keep the paper wet and lubricated. This will speed up your sanding and give you a better finish.
When repairing spider cracks, you will want to make sure that the resulting filler is shaped in a “V.” If the crack goes across a cleat or stanchion, it is probably best to rework the hardware and not just patch the gelcoat. This will reduce the risk of future cracking in that area and will allow you to maintain a uniform appearance on the entire boat.
If you are attempting to repair deep gouges or chips that have sharp edges, you will need to prep the area by using a miniature grinding tool like a Dremel tool or even the corner of a screwdriver. This will help to round out the sharp corners of the gouge so that when you add gelcoat paste, it will blend into the surrounding surface.
You will also want to use the Dremel or a file on any areas that look “orange peel” after spraying. This will even out the finish and make it more attractive. Using a power sander can create ridges in the surface, so it is better to sand by hand with 120-grit abrasive paper wrapped around a block. As you sand, periodically run your fingers over the surface to check for a smooth finish.
Once the gelcoat is sanded and polished, you can begin applying your top coat of gelcoat. Be sure to follow the manufacturer’s recommendations for application. After each application, wait 15-20 minutes before resanding and applying another coat.
How to Spot an Emergency Electrician
Having the right Emergency Electrician in your corner can mean the difference between saving your home and experiencing a tragedy. Research your potential contractors ahead of time and be sure to ask about their licensing, insurance, and cost. If you’re hearing buzzing sounds in your home or if electrical switches feel warm to the touch, these are signs that something is wrong and needs immediate attention from an emergency electrician.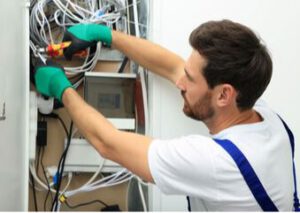
Exposed wires are an electrical hazard and pose serious health risks for anyone who comes into contact with them. If touched, exposed cords and cables can cause burns, shocks, or even electrocution. This is particularly dangerous in the workplace, where exposed wiring can lead to fires and injuries. This is why it is important to search for a nearby electrician and have them fix any electrical issues immediately.
There are many places to find exposed wires, such as the power cords of electrical appliances, extension cords, and the cords attached to power boards. Electrical outlets with displaced or missing covers can also expose wiring. Having an exposed front plug can pose dangers for any employee who plugs in an appliance or turns on the light switch. This is because they may accidentally touch the live and ground wires, causing an electric shock or a fire.
Another common place to find exposed wires is inside the structure of your home. This can be a hidden danger and a sure sign of a major problem. You may notice strange smells coming from your walls or hear buzzing and clicking noises. This is a good indication that there is a fire behind the wall, and if it is not fixed immediately, it could lead to a total house fire.
If you are not sure whether or not there is a fire behind your walls, then you can ask around to see if your neighbors have also experienced a sudden loss of power. You can also try turning on your lights to see if they glow. If they don’t, then it’s time to call an emergency electrician.
It is important to remember that it’s not safe to work on any electrical equipment that has a current of more than 50 volts. This is especially true if you are not familiar with proper safety measures such as lockout and tagout procedures and personal protective equipment. It is also not a good idea to patch or repair any exposed wiring yourself, as this can lead to further damage and injury.
Smoke from the socket
If an outlet starts smoking, it’s a fire hazard that’s very dangerous to be around. This is because the smoke that’s emitted is hot, and it will cause the other electrical wiring to overheat, which in turn can lead to a fire that could damage the wall and your home.
If you see an outlet that’s smoking, immediately turn off the power to it at your circuit breaker. Then, gently touch the wall to see if it’s warm or smells like smoke. If it does, evacuate the room and call 911 to report an electrical fire in progress. It’s also possible that the outlet itself may be burned out, in which case you should turn off all of the power to your house and wait for an emergency electrician to arrive.
Most licensed electricians charge by the hour, and emergency and after-hours electrical services are typically billed at 1.5X to 2X their regular rate plus a trip fee of around $75 or $200. You can try to save money by looking for a local electrician who’ll spend less time traveling and therefore charge a lower call-out fee. You should also choose an electrician who’ll come in a truck well-stocked with all the possible spare parts for your electrical issues, so you won’t have to pay extra to get them from a warehouse.
Workplaces consume a lot of electricity due to the lighting, HVAC, multiple office computers, and other appliances. As a result, workers and business owners will often encounter electrical problems that need to be fixed immediately by an emergency electrician. Electricians are highly skilled professionals who can fix a wide range of electrical problems, such as flickering lights, buzzing outlets, and faulty junction boxes.
In addition to being a fire hazard, overheated wires can also create sparks that can damage the surrounding walls and furniture. This can be especially serious if you have children or pets in the room. If you notice a smell of burning plastic or see scorch marks on your walls, it’s time to call an emergency electrician.
Water Damage
If the wires at your workplace are exposed to water, it is a serious electrical issue that should not be ignored. It is essential that you seek the services of an emergency electrician immediately to prevent further damage to the wiring system and ensure that everyone is safe at your place of work.
If your home or office is experiencing frequent power outages, you should call an emergency electrician immediately. This is because a sudden power outage usually indicates an electrical problem with the wiring. If left unattended, this can lead to a fire breakout or even major injuries to your family members.
You should also call an emergency electrician if you notice a sudden increase in your electricity bills. This is because a rise in your electricity bill could indicate that the wiring needs to be replaced or upgraded. This can help reduce your energy consumption and save you money in the long run.
Another sign that you need an emergency electrician is if your light bulbs burn out quickly. While it is normal to have to change a light bulb occasionally, this should not happen regularly. If you find that you are changing the light bulb more often, it is a sign that there is a bigger problem with your wiring system.
A burning plastic odor is a sure sign that there is an electrical issue in your home. The odor can be caused by overloaded outlets, cords, and other electrical equipment that is overheating. If you notice this odor, it is important to switch off the power at the breaker box and unplug the appliance. This will prevent further damage and protect your family from electric shocks until an emergency electrician arrives to resolve the issue.
In the event of a flood or leak in your home, you should turn off the power before leaving the building. If the water contains salt spray or other corrosive materials, you may need to replace your electrical appliances and wiring. It is important that you do not return any equipment to service until an electrician has evaluated it. Returning water-damaged electrical equipment without an evaluation could result in an electrical fire, electrocution, or other injuries.
Overloaded Outlets
The modern home includes many electrical appliances, but too many can cause overload. If you’ve plugged in too many devices and the lights start flickering or your circuit breaker starts tripping, it’s time to call an emergency electrician. A humming sound from an outlet or switch may also indicate that there’s an electrical issue that needs to be addressed.
Even if the problem doesn’t result in a house fire, it can cause major damage to your electrical wiring and outlets and increase your risk of a power surge or a fire in the future. Licensed electricians are experienced in dealing with all kinds of electrical problems, so you can trust them to get the job done correctly.
If you notice scorched or melted outlet covers, it’s a sign that the electrical system is overheating and can be dangerous for your family. It’s also a good idea to check for black smudges on switches and outlets, as these can be signs of a fire behind the cover.
Emergency electricians are used to working on holidays, evenings, and weekends, so they can come out whenever you need them. It’s worth pointing out that a professional can also help you prevent these issues from occurring in the first place by suggesting changes to your electrical system, such as adding extra outlets or extending existing ones.
You can also reduce the risk of an overloaded outlet by making sure that different types of appliances are on separate circuits. If you’re using extension cords, make sure they don’t have cracks in the insulation. Never plug more than one heat-producing appliance into a single outlet, and position kitchen appliances like toasters so that they can be run on a separate circuit.
Taking the time to think about when it’s safe or not to use 24/7 emergency electricians will save you money in the long run by avoiding costly repairs and ensuring that your family and home are safe. If you’re unsure about whether your electrical problem is serious enough to call an emergency electrician, it’s better to be safe than sorry and have someone check it out for you.
What You Need to Know About House Painters
House painting is an important home improvement task that helps protect your property from the elements and keeps it looking good. It also allows you to enjoy your home more.
Hiring Painters to paint your home is the best option if you want to save time and money and get high-quality work. Here are some of the reasons why you should hire a professional house painter for your next home improvement project:
House painters need all the right equipment to complete their jobs. This can help them get the job done faster and easier. It can also save them money in the long run.
They can sand and scrape walls to remove old paint, repair cracks, apply primer or other coating materials, protect furniture, and use protective tape to control drips. This ensures a smooth finish and keeps clients happy.
Painting a home can be a tedious task. It can take hours, and it can be difficult to reach high ceilings or corners. That’s why many people turn to professional painters.
A house painting contractor has a crew of workers working on the job, and they can quickly complete a painting project. They can also handle a variety of tasks, such as applying caulk and spreading spackle.
They need a variety of tools to do their job, and they also have some extras that they can keep on hand. Some of these tools aren’t necessary for every paint job, but they can make the task more convenient and less tedious.
Having a good set of brushes is essential for any house painting project. A brush that dispenses paint evenly is important because it’s better for covering large areas.
A roller pole is another essential tool for any professional house painter. These are a little pricey, but they’re invaluable for keeping the paint where it needs to be.
If you’re going to be painting a lot, you should invest in a 2- to 4-foot extendable Sherlock pole. These can be very handy for rolling around vaulted ceilings or exterior cornerboards, especially if you’re painting in the summertime.
You’ll also need a razor knife and a paint scraper for removing loose paint, cutting painter’s tape, and cutting the tip off of a caulk tube. You can also buy dripless caulk guns if you’re doing large caulk jobs or want to avoid messes.
You’ll need other essentials like a hammer, screwdriver, and nail clipper for doing drywall repairs. A putty knife is also a great tool for patching holes and cracks in drywall. You can use this to cover a larger hole than the 7-in-1 tool or to put joint compound in places where it’s hard to get.
House painters need to have a lot of experience in order to perform their duties correctly. This includes knowing how to prep the surfaces and apply paint with various tools and techniques, as well as observing safety measures.
They should also be knowledgeable about selecting the right paint for different types of surface finishes and textures, as well as how to match paint colors with other decor elements in the home. Having these skills will help them provide high-quality service to their customers.
Ideally, a good painter will have a minimum of three years’ experience working in the field. This will give them the confidence to do a great job and be able to get more clients in the future.
There are several ways to gain the necessary experience for this career, including through apprenticeships and certificate programs. These can take anywhere from six months to four years, depending on the state you live in.
You can also get a degree in this field. An associate’s degree will take about two years, while a certificate program can be completed in as little as one year.
Another way to gain experience as a house painter is to look into training programs. These can be found at many community colleges and technical schools. They will teach you the basic skills and knowledge you need to work as a house painter, as well as more advanced classes like painting master classes that can earn you extra certifications that increase your pay rate.
Finally, you can get experience as a house painter by working with a local contractor. These are smaller companies that often have a lot of experience and are very reliable. They also have a reputation for doing high-quality work and have valid insurance.
Drywall Repair – What to Look For in a Contractor
When repairing drywall, it is important to know the right tools and materials. Then you should also know what to look for in a contractor.
Finding a reputable contractor is more challenging than you may think. Make sure you research and remember to ask for references and referrals. Getting a quote from an expert at Drywall Repair San Diego will be the most direct way to determine how much it will cost you to repair your drywall. It’s also a good idea to look into project management software that will track your expenses, personal hours, and equipment usage.
You’ll need to find a professional drywall repair contractor if you want to make some drywall repairs. Whether you are repairing a rip, a hole, or a crack, hiring someone who can get the job done right is important. One way to ensure the job gets done is to get multiple quotes. This will help you get a more accurate cost estimate. You should also check to see if your potential contractor has a license. In addition, you should ask if they are insured. The drywall repair industry is regulated, and you should be careful to avoid anyone who doesn’t hold a valid permit or insurance.
When you need to patch drywall, it’s important to know which materials to use. Choosing the wrong materials can make the project much more difficult than it should be. Fortunately, there are many options. If you choose the right materials, you’ll be able to repair your drywall quickly and effectively. First, assess the damage. The size of the hole will determine what material you need to use. Small holes are simple to fix, but larger holes will require a different technique.
Small holes can be repaired with joint compound or spackle. These are the easiest and least expensive methods to use. However, you may need to cut the drywall away if you have larger holes. You also need to sand the area with sandpaper to remove any dimples. Once the area is sanded, you can fill it with a mixture of joint compounds and spackle. Remember to use enough to cover the area. If you don’t want to take on the task on your own, you can buy a drywall patch kit. These kits include everything you need to repair your drywall. They are usually available at home improvement centers.
Drywall compound is used to repair cracks, holes, and nicks in drywall. It comes in a variety of forms. The most common type is fiberglass mesh with adhesive. When you are applying drywall compound, you will need a few tools. Depending on the size of the hole, you may need to use tape or a hammer and trowel. If the hole is larger than three inches, you will have to cut it out and replace it with new drywall.
When you are learning how to apply drywall compound, you will need to take your time. This way, you can make sure your job is done correctly. After you have sanded the area, it is time to apply the compound. You should be able to spread it out over a wider area. Once you have filled the entire corner, you should be able to use your knife to apply a thin coat over the entire seam. Using a tape like fiberglass-mat tape can be a great way to cover up plaster cracks. However, this type of material is not recommended as a finish coat.
There are many reasons you might need to install a new piece of drywall for drywall repair. If your drywall has been damaged due to water or other issues, it can be a simple DIY project. First, you must find the studs on the wall. This will make the repair easier. You can use a stud finder or a carpenter’s square to identify them.
Next, you’ll need to mark the area to be cut. A T-square or a carpenter’s square can help you draw a straight line on the drywall. Alternatively, you can use a hole saw to cut the damaged area out. Once you’ve traced the damaged area, you’ll need to make a few cuts with a utility knife. Be sure to leave an extra half inch of material all around the hole.
Once you’ve cut out the damaged area, you’ll need to apply joint compound and sand the patch. Make sure to use a good quality compound. Sand the patch after it’s dry to ensure it’s smooth.
How to Hire a House Painter
If you want to know how to hire a professional painter, you’ve come to the right place. Visit Website to learn tips on hiring a painting company, how much paint you need, and more.
If you’re looking to paint your home, you’ll need to take the time to choose a painting contractor who can provide you with a quality finish. Using a professional to do the job can add thousands of dollars to the total cost.
It can be a stressful process to hire a painter, but you can make the process much easier by asking a few questions beforehand. You can also check online for reviews and get recommendations from friends and neighbors.
The price of a painter can vary widely, depending on their experience level and the complexity of the job. The final price will include the costs of materials and labor. Typically, it costs around $2 per square foot to paint a room.
Depending on the type of paint you choose, the overall cost of the job can vary from a few dollars to several thousand dollars. Paint and materials will account for about 20% of the final cost.
When hiring a professional painter, it’s important to ask about insurance and warranties. This will protect you from liability. Generally, a painting contractor should charge at least 10 percent of the job’s total cost for the down payment.
For larger projects, the price can be more expensive, especially if you’re hiring an expert. Some of the more complicated jobs require special skills, like spray painting or lead removal. Painting your walls can be a great way to increase the resale value of your home.
The cost of hiring a painter will vary based on the size of your house. A small apartment will only cost you about $200 to paint, while a 4,000-square-foot house can cost a couple of thousand dollars.
To give you an idea of how much the painting project will cost, you can use the painting estimate calculator. It will calculate the cost based on your area, including the number of gallons of paint and the types of products you need.
Before you start the painting project, prepare the area to be painted. You’ll need a certain amount of time to let the paint dry. There are other factors to consider, such as humidity, wind, and temperature.
House painting is a daunting undertaking. It requires you to put your best foot forward in order to ensure that the outcome is a rousing success. For example, you should be able to identify the difference between a mediocre paint job and an eminently acceptable one. In addition, you should also pay attention to the quality of the house painters’ tools and materials.
One of the biggest mistakes you can make is to not bother with all of the small details. This includes preparing the room for painting. By ensuring that you clean off all the dirt and grime before you start, you will be rewarded with a better final product. You should also consider the type of flooring you have before you set about your painting mission. Painting a kitchen or bathroom is particularly tricky because you don’t want to end up with oil splatter on your walls. To avoid this pitfall, be sure to apply a layer of degreaser first.
As with any home improvement project, you should be prepared to put in the hard yards. Not only should you prepare your surfaces in advance, but you should be sure to properly store your tools and materials as well. The best part is that you can do all of this for less than you would pay for a professional painting service. And, as a bonus, you will be able to enjoy the results yourself!
The best way to do this is to plan out your entire project beforehand. The end result will be a more polished and professional-looking house. Having a game plan will not only keep you on track but also ensure that you get to enjoy your newly repainted space. So, if you have been itching to freshen up your home, make sure that you put your best foot forward and don’t be afraid to do a little research! Whether you are a novice or a seasoned professional, you should be able to paint your house for less than you might pay to have a pro do the job. Do your homework, and you’ll be on your way to a more aesthetically pleasing space in no time at all.