


Gel Coat Repair Basics
With a little time and know-how, gel coat can be repaired easily to look as good as new. Start by finding an area of the hull identical in color to the damaged gelcoat and using it as your mixing palette. Decant enough plain white pigment to complete the repair onto the palette. This article covers some of the most common gel coat repair problems and how to fix them.
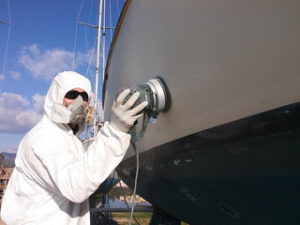 Impacts with hard objects like winch handles or downrigger weights often scratch the gel coat. The damage can be repaired by washing, sanding and polishing with rubbing compound to restore the gloss of the damaged area. However, some deeper gouges and scratches require structural fiberglass repair or filler before reapplying the gel coat.
A basic gelcoat kit will contain everything you need to repair a shallow scratch or gouge on your boat’s hull, deck or other surfaces. The kit will include the correct gelcoat base and catalyst ratio, plus pigments to match your boat’s color. The kit will also have a plastic spreader and a putty knife. Remove any loose flakes or fragments before starting to repair the scratch or gouge and clean the surface with acetone. Then, tape off the affected area with masking tape and a small section around it to protect it from any accidental spills or splashes.
Select a part of the hull that is identical in color to the damaged area to use as your mixing palette. This will allow you to better color-match the gel coat later. Then, sand the affected area with 1,000-grit sandpaper to smooth and remove scratches, chalking and other imperfections.
Once the sanding is complete, wipe down the area and clean it with acetone to remove any remaining traces of dirt or grease on the hull surface. Then, using the plastic spreader and a putty blade, work the gelcoat paste into the scratch, making sure that it is fully filled and leaves no air pockets behind. The paste will bulge a little behind the plastic spreader; this is normal because polyester resin shrinks slightly when it cures.
Once the gelcoat paste sets (cure), you can leave it as is; the scratches are sealed, the under layer fiberglass is protected and it looks good. But if you’re not satisfied, you can further buff the area with rubbing compound to make it shine like new.
Deeper scratches and gouges must be filled with resin and epoxy-based filler instead of polyester. These products are more expensive but adhere better and last longer than polyester fillers. Once filled, they need to be sanded and cleaned before you can apply gelcoat or boat paint.
From rope chafing on coamings to the occasional bump from a dock or trailer, gelcoat chips are an unavoidable part of owning a boat. These areas can be restored to look like new and help protect the fiberglass hull from damage in the future. It’s a good idea to repair these imperfections as soon as possible, not only to improve your boat’s appearance but also because it will extend the life of the underlying laminate. The key to successfully repairing gelcoat damage is less about specific skills than preparation and process.
It’s important to keep your work area and spray equipment free of contamination to ensure that the gelcoat is cured properly. Moisture, oil and dirt can cause the gel coat to peel or crack. In addition, the correct ratio of catalyst to resin needs to be used in order to cure properly. Using too much or not enough of either will result in the gel coat drying too fast or not curing at all.
Gelcoat is a thicker material than paint which provides added protection to your boat hull from scratches and chips. This protective layer is usually applied at the factory, but it does eventually wear away over time. Wholesale Marine carries a full line of gelcoat repair products from Fiberglass Evercoat and Hi-Bond, including both liquid and paste gelcoat.
When repairing a chip or scratch it is important to use the proper filler and resin. Gelcoat paste is fine for a quick fill that hides the scratch or chip, but it can easily crack around the edges due to too much shrinking and may have pin holes showing after polishing. Using gelcoat resin and a proper filler will result in a more solid filled repair that will blend into the existing surface.
A common mistake people make when repairing a crack or chip is adding too much resin which will result in a thicker than normal strip that will pull away from the glass and eventually delaminate. This can be avoided by sanding the area before applying the resin to ensure that you have a smooth surface.
While most scratches and chips result from impacts with hard objects (winch handles, downrigger weights, 15-pound lobsters) cracks in gel coat are usually a sign of an underlying structural problem. It’s important to understand how cracks form and how to repair them properly.
Cracks in gelcoat can be caused by exposure to chemicals, water damage or even just the natural aging process. Using a proper repair technique and taking the time to prep the area is essential. It’s also important to use a quality epoxy or polyester and to ensure you have the correct application equipment and a clean work area.
A good repair begins with thoroughly washing the area to remove any dirt and oils. Tape off sensitive areas to avoid gelcoat spatter or accidental sanding. Then wet sand the area with 220 grit sandpaper to create a shallow bevel and then wipe down with acetone. This will remove any surface contamination and give the new gelcoat a solid base to bond with.
It’s recommended to apply a few coats of gelcoat in order to get the best finish. Leave 15-20 minutes between each coat to allow the gelcoat to dry. It is important to mix the right amount of catalyst with the gelcoat and to work swiftly. Once the gelcoat has catalyzed you have only about 10 minutes to work before it starts to harden.
If you’re repairing cracks, it’s important to be aware of the direction of the crack as well as the depth of the crack. This will help you determine which direction to repair the crack. If you’re unsure, we recommend hiring an experienced fiberglass and gelcoat technician to assist you.
To help prevent further cracking, we recommend adding a layer of Durabak to your gelcoat following the repair. This is a heavy-duty marine-grade fiberglass fabric that adds strength, resilience and protects against impact.
Dull gel coat surfaces can often be restored with proper sanding and polishing compounds to bring back the shine. This is also a great way to repair pinholes which can happen when the gelcoat is not cured properly. This can be a sign of improper sanding or insufficient catalyst being added.
Before you apply gelcoat to a cracked surface, you have to thoroughly wet-sand the whole area. This ensures that you will be working with a completely smooth surface and minimizes the likelihood of “fisheyes” (abnormal bumps) or cracks in the final coat of gelcoat.
This step also removes any waxes or other contaminants that could interfere with the bond between the damaged area and the new gelcoat. When wet-sanding, use a finer grit than you would normally use on a dry sandpaper. 320 or 400 grit wet paper works well for this step. Use a bucket of clean water to keep the paper wet and lubricated. This will speed up your sanding and give you a better finish.
When repairing spider cracks, you will want to make sure that the resulting filler is shaped in a “V.” If the crack goes across a cleat or stanchion, it is probably best to rework the hardware and not just patch the gelcoat. This will reduce the risk of future cracking in that area and will allow you to maintain a uniform appearance on the entire boat.
If you are attempting to repair deep gouges or chips that have sharp edges, you will need to prep the area by using a miniature grinding tool like a Dremel tool or even the corner of a screwdriver. This will help to round out the sharp corners of the gouge so that when you add gelcoat paste, it will blend into the surrounding surface.
You will also want to use the Dremel or a file on any areas that look “orange peel” after spraying. This will even out the finish and make it more attractive. Using a power sander can create ridges in the surface, so it is better to sand by hand with 120-grit abrasive paper wrapped around a block. As you sand, periodically run your fingers over the surface to check for a smooth finish.
Once the gelcoat is sanded and polished, you can begin applying your top coat of gelcoat. Be sure to follow the manufacturer’s recommendations for application. After each application, wait 15-20 minutes before resanding and applying another coat.
How to Spot an Emergency Electrician
Having the right Emergency Electrician in your corner can mean the difference between saving your home and experiencing a tragedy. Research your potential contractors ahead of time and be sure to ask about their licensing, insurance, and cost. If you’re hearing buzzing sounds in your home or if electrical switches feel warm to the touch, these are signs that something is wrong and needs immediate attention from an emergency electrician.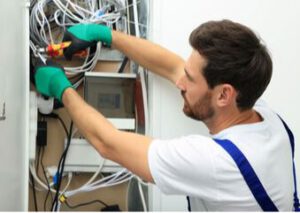
Exposed wires are an electrical hazard and pose serious health risks for anyone who comes into contact with them. If touched, exposed cords and cables can cause burns, shocks, or even electrocution. This is particularly dangerous in the workplace, where exposed wiring can lead to fires and injuries. This is why it is important to search for a nearby electrician and have them fix any electrical issues immediately.
There are many places to find exposed wires, such as the power cords of electrical appliances, extension cords, and the cords attached to power boards. Electrical outlets with displaced or missing covers can also expose wiring. Having an exposed front plug can pose dangers for any employee who plugs in an appliance or turns on the light switch. This is because they may accidentally touch the live and ground wires, causing an electric shock or a fire.
Another common place to find exposed wires is inside the structure of your home. This can be a hidden danger and a sure sign of a major problem. You may notice strange smells coming from your walls or hear buzzing and clicking noises. This is a good indication that there is a fire behind the wall, and if it is not fixed immediately, it could lead to a total house fire.
If you are not sure whether or not there is a fire behind your walls, then you can ask around to see if your neighbors have also experienced a sudden loss of power. You can also try turning on your lights to see if they glow. If they don’t, then it’s time to call an emergency electrician.
It is important to remember that it’s not safe to work on any electrical equipment that has a current of more than 50 volts. This is especially true if you are not familiar with proper safety measures such as lockout and tagout procedures and personal protective equipment. It is also not a good idea to patch or repair any exposed wiring yourself, as this can lead to further damage and injury.
Smoke from the socket
If an outlet starts smoking, it’s a fire hazard that’s very dangerous to be around. This is because the smoke that’s emitted is hot, and it will cause the other electrical wiring to overheat, which in turn can lead to a fire that could damage the wall and your home.
If you see an outlet that’s smoking, immediately turn off the power to it at your circuit breaker. Then, gently touch the wall to see if it’s warm or smells like smoke. If it does, evacuate the room and call 911 to report an electrical fire in progress. It’s also possible that the outlet itself may be burned out, in which case you should turn off all of the power to your house and wait for an emergency electrician to arrive.
Most licensed electricians charge by the hour, and emergency and after-hours electrical services are typically billed at 1.5X to 2X their regular rate plus a trip fee of around $75 or $200. You can try to save money by looking for a local electrician who’ll spend less time traveling and therefore charge a lower call-out fee. You should also choose an electrician who’ll come in a truck well-stocked with all the possible spare parts for your electrical issues, so you won’t have to pay extra to get them from a warehouse.
Workplaces consume a lot of electricity due to the lighting, HVAC, multiple office computers, and other appliances. As a result, workers and business owners will often encounter electrical problems that need to be fixed immediately by an emergency electrician. Electricians are highly skilled professionals who can fix a wide range of electrical problems, such as flickering lights, buzzing outlets, and faulty junction boxes.
In addition to being a fire hazard, overheated wires can also create sparks that can damage the surrounding walls and furniture. This can be especially serious if you have children or pets in the room. If you notice a smell of burning plastic or see scorch marks on your walls, it’s time to call an emergency electrician.
Water Damage
If the wires at your workplace are exposed to water, it is a serious electrical issue that should not be ignored. It is essential that you seek the services of an emergency electrician immediately to prevent further damage to the wiring system and ensure that everyone is safe at your place of work.
If your home or office is experiencing frequent power outages, you should call an emergency electrician immediately. This is because a sudden power outage usually indicates an electrical problem with the wiring. If left unattended, this can lead to a fire breakout or even major injuries to your family members.
You should also call an emergency electrician if you notice a sudden increase in your electricity bills. This is because a rise in your electricity bill could indicate that the wiring needs to be replaced or upgraded. This can help reduce your energy consumption and save you money in the long run.
Another sign that you need an emergency electrician is if your light bulbs burn out quickly. While it is normal to have to change a light bulb occasionally, this should not happen regularly. If you find that you are changing the light bulb more often, it is a sign that there is a bigger problem with your wiring system.
A burning plastic odor is a sure sign that there is an electrical issue in your home. The odor can be caused by overloaded outlets, cords, and other electrical equipment that is overheating. If you notice this odor, it is important to switch off the power at the breaker box and unplug the appliance. This will prevent further damage and protect your family from electric shocks until an emergency electrician arrives to resolve the issue.
In the event of a flood or leak in your home, you should turn off the power before leaving the building. If the water contains salt spray or other corrosive materials, you may need to replace your electrical appliances and wiring. It is important that you do not return any equipment to service until an electrician has evaluated it. Returning water-damaged electrical equipment without an evaluation could result in an electrical fire, electrocution, or other injuries.
Overloaded Outlets
The modern home includes many electrical appliances, but too many can cause overload. If you’ve plugged in too many devices and the lights start flickering or your circuit breaker starts tripping, it’s time to call an emergency electrician. A humming sound from an outlet or switch may also indicate that there’s an electrical issue that needs to be addressed.
Even if the problem doesn’t result in a house fire, it can cause major damage to your electrical wiring and outlets and increase your risk of a power surge or a fire in the future. Licensed electricians are experienced in dealing with all kinds of electrical problems, so you can trust them to get the job done correctly.
If you notice scorched or melted outlet covers, it’s a sign that the electrical system is overheating and can be dangerous for your family. It’s also a good idea to check for black smudges on switches and outlets, as these can be signs of a fire behind the cover.
Emergency electricians are used to working on holidays, evenings, and weekends, so they can come out whenever you need them. It’s worth pointing out that a professional can also help you prevent these issues from occurring in the first place by suggesting changes to your electrical system, such as adding extra outlets or extending existing ones.
You can also reduce the risk of an overloaded outlet by making sure that different types of appliances are on separate circuits. If you’re using extension cords, make sure they don’t have cracks in the insulation. Never plug more than one heat-producing appliance into a single outlet, and position kitchen appliances like toasters so that they can be run on a separate circuit.
Taking the time to think about when it’s safe or not to use 24/7 emergency electricians will save you money in the long run by avoiding costly repairs and ensuring that your family and home are safe. If you’re unsure about whether your electrical problem is serious enough to call an emergency electrician, it’s better to be safe than sorry and have someone check it out for you.