Home » Articles posted by Veronica McWhorter
Author Archives: Veronica McWhorter


Gel Coat Repair Basics
With a little time and know-how, gel coat can be repaired easily to look as good as new. Start by finding an area of the hull identical in color to the damaged gelcoat and using it as your mixing palette. Decant enough plain white pigment to complete the repair onto the palette. This article covers some of the most common gel coat repair problems and how to fix them.
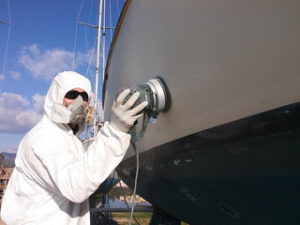 Impacts with hard objects like winch handles or downrigger weights often scratch the gel coat. The damage can be repaired by washing, sanding and polishing with rubbing compound to restore the gloss of the damaged area. However, some deeper gouges and scratches require structural fiberglass repair or filler before reapplying the gel coat.
A basic gelcoat kit will contain everything you need to repair a shallow scratch or gouge on your boat’s hull, deck or other surfaces. The kit will include the correct gelcoat base and catalyst ratio, plus pigments to match your boat’s color. The kit will also have a plastic spreader and a putty knife. Remove any loose flakes or fragments before starting to repair the scratch or gouge and clean the surface with acetone. Then, tape off the affected area with masking tape and a small section around it to protect it from any accidental spills or splashes.
Select a part of the hull that is identical in color to the damaged area to use as your mixing palette. This will allow you to better color-match the gel coat later. Then, sand the affected area with 1,000-grit sandpaper to smooth and remove scratches, chalking and other imperfections.
Once the sanding is complete, wipe down the area and clean it with acetone to remove any remaining traces of dirt or grease on the hull surface. Then, using the plastic spreader and a putty blade, work the gelcoat paste into the scratch, making sure that it is fully filled and leaves no air pockets behind. The paste will bulge a little behind the plastic spreader; this is normal because polyester resin shrinks slightly when it cures.
Once the gelcoat paste sets (cure), you can leave it as is; the scratches are sealed, the under layer fiberglass is protected and it looks good. But if you’re not satisfied, you can further buff the area with rubbing compound to make it shine like new.
Deeper scratches and gouges must be filled with resin and epoxy-based filler instead of polyester. These products are more expensive but adhere better and last longer than polyester fillers. Once filled, they need to be sanded and cleaned before you can apply gelcoat or boat paint.
From rope chafing on coamings to the occasional bump from a dock or trailer, gelcoat chips are an unavoidable part of owning a boat. These areas can be restored to look like new and help protect the fiberglass hull from damage in the future. It’s a good idea to repair these imperfections as soon as possible, not only to improve your boat’s appearance but also because it will extend the life of the underlying laminate. The key to successfully repairing gelcoat damage is less about specific skills than preparation and process.
It’s important to keep your work area and spray equipment free of contamination to ensure that the gelcoat is cured properly. Moisture, oil and dirt can cause the gel coat to peel or crack. In addition, the correct ratio of catalyst to resin needs to be used in order to cure properly. Using too much or not enough of either will result in the gel coat drying too fast or not curing at all.
Gelcoat is a thicker material than paint which provides added protection to your boat hull from scratches and chips. This protective layer is usually applied at the factory, but it does eventually wear away over time. Wholesale Marine carries a full line of gelcoat repair products from Fiberglass Evercoat and Hi-Bond, including both liquid and paste gelcoat.
When repairing a chip or scratch it is important to use the proper filler and resin. Gelcoat paste is fine for a quick fill that hides the scratch or chip, but it can easily crack around the edges due to too much shrinking and may have pin holes showing after polishing. Using gelcoat resin and a proper filler will result in a more solid filled repair that will blend into the existing surface.
A common mistake people make when repairing a crack or chip is adding too much resin which will result in a thicker than normal strip that will pull away from the glass and eventually delaminate. This can be avoided by sanding the area before applying the resin to ensure that you have a smooth surface.
While most scratches and chips result from impacts with hard objects (winch handles, downrigger weights, 15-pound lobsters) cracks in gel coat are usually a sign of an underlying structural problem. It’s important to understand how cracks form and how to repair them properly.
Cracks in gelcoat can be caused by exposure to chemicals, water damage or even just the natural aging process. Using a proper repair technique and taking the time to prep the area is essential. It’s also important to use a quality epoxy or polyester and to ensure you have the correct application equipment and a clean work area.
A good repair begins with thoroughly washing the area to remove any dirt and oils. Tape off sensitive areas to avoid gelcoat spatter or accidental sanding. Then wet sand the area with 220 grit sandpaper to create a shallow bevel and then wipe down with acetone. This will remove any surface contamination and give the new gelcoat a solid base to bond with.
It’s recommended to apply a few coats of gelcoat in order to get the best finish. Leave 15-20 minutes between each coat to allow the gelcoat to dry. It is important to mix the right amount of catalyst with the gelcoat and to work swiftly. Once the gelcoat has catalyzed you have only about 10 minutes to work before it starts to harden.
If you’re repairing cracks, it’s important to be aware of the direction of the crack as well as the depth of the crack. This will help you determine which direction to repair the crack. If you’re unsure, we recommend hiring an experienced fiberglass and gelcoat technician to assist you.
To help prevent further cracking, we recommend adding a layer of Durabak to your gelcoat following the repair. This is a heavy-duty marine-grade fiberglass fabric that adds strength, resilience and protects against impact.
Dull gel coat surfaces can often be restored with proper sanding and polishing compounds to bring back the shine. This is also a great way to repair pinholes which can happen when the gelcoat is not cured properly. This can be a sign of improper sanding or insufficient catalyst being added.
Before you apply gelcoat to a cracked surface, you have to thoroughly wet-sand the whole area. This ensures that you will be working with a completely smooth surface and minimizes the likelihood of “fisheyes” (abnormal bumps) or cracks in the final coat of gelcoat.
This step also removes any waxes or other contaminants that could interfere with the bond between the damaged area and the new gelcoat. When wet-sanding, use a finer grit than you would normally use on a dry sandpaper. 320 or 400 grit wet paper works well for this step. Use a bucket of clean water to keep the paper wet and lubricated. This will speed up your sanding and give you a better finish.
When repairing spider cracks, you will want to make sure that the resulting filler is shaped in a “V.” If the crack goes across a cleat or stanchion, it is probably best to rework the hardware and not just patch the gelcoat. This will reduce the risk of future cracking in that area and will allow you to maintain a uniform appearance on the entire boat.
If you are attempting to repair deep gouges or chips that have sharp edges, you will need to prep the area by using a miniature grinding tool like a Dremel tool or even the corner of a screwdriver. This will help to round out the sharp corners of the gouge so that when you add gelcoat paste, it will blend into the surrounding surface.
You will also want to use the Dremel or a file on any areas that look “orange peel” after spraying. This will even out the finish and make it more attractive. Using a power sander can create ridges in the surface, so it is better to sand by hand with 120-grit abrasive paper wrapped around a block. As you sand, periodically run your fingers over the surface to check for a smooth finish.
Once the gelcoat is sanded and polished, you can begin applying your top coat of gelcoat. Be sure to follow the manufacturer’s recommendations for application. After each application, wait 15-20 minutes before resanding and applying another coat.
How to Plan a Successful Kitchen Remodeling
When remodeling your kitchen, choose the right contractor for many things to consider! Hiring a professional kitchen remodeling contractor is best if you want a modern, stress-free look. Kitchen Remodeling will ensure that your new space is safe and functional for work. A professional contractor will also provide advice on how to make the space safer to work in. A professional can help you make plans and clarify your design and budget.
 First, determine the location of the refrigerator and cabinet doors. If you’d like to relocate the spice drawer, plan. If possible, use existing walls for the remodeling project. This way, plumbing and electrical systems are left intact, and you’ll not need to tear down walls. However, if you’d rather take on a DIY project, you’ll have to check your budget to ensure you’ll have enough money to complete the entire project.
A fresh, modern kitchen can greatly increase its value when a home is on the market. It’s a good idea to hire a professional kitchen remodeling contractor to help you decide on the design you want. These experts know what models are available and have experience with larger remodeling projects. Remember that a cluttered kitchen is dangerous, and sharp knives can hide in places where the kitchen is less accessible. You won’t want to spend time searching for them or repairing damaged appliances or counter space.
Most Americans spend about $21,000 on a kitchen remodeling project. However, a simple project that involves changing the facade of a cabinet or installing a tile backsplash will cost less than $10,000. After you’ve figured out your budget, it’s time to prioritize your needs. First, determine which items are must-haves and can’t wait. These may include new countertops, updated appliances, electrical systems, and a new sink.
Before you hire a professional, it’s important to identify which aspects of your current kitchen are most problematic. Then, make a list of your top priorities and ensure that the kitchen remodeling project doesn’t have any setbacks or surprises. The checklist will help you plan your remodeling, prevent costly setbacks, and keep the project on schedule. After you’ve done this, you’ll be ready to hire the work crew.
Consider the size of the kitchen. You may have a larger kitchen than the one you currently have. If this is the case, you’ll probably need additional services or more expensive materials. Depending on the size of your kitchen, you may want to consider using more glass. It will give a room a feeling of open space while providing functional storage. However, you should always consider your needs and budget when remodeling your kitchen. If you plan on selling the house shortly, you’ll need to remove some personal elements.
Your kitchen is the heart of the home. It’s the place where kids do their homework, where family members gather, and where you entertain guests. If your kitchen is outdated, it may be time for a Kitchen Remodeling project. This project can be as simple or as extensive as you want. The key is finding a designer who can provide you with the design, colors, and functionality you’re looking for. You can find kitchen remodeling contractors with a variety of styles and budgets.
Before beginning your Kitchen Remodeling project:
- Consider a few important details.
- Consider the amount of storage space and doorway clearance, and create a logical timeline.
- Order cabinets after you’ve taken measurements for appliances.
- Consider creative design ideas, like repurposing floors, glass pane cabinets, or chalkboard paint walls.
These additions can add personalization and appeal to your kitchen without costing an arm and a leg.
Kitchen Remodeling costs can add up quickly. Custom cabinets, quartz counters, and a large island can add thousands of dollars. For this reason, you should create a budget and stick to it. A good plan details the tasks you’ll need to complete and helps you stay on track during the project. Once you’ve made your plan, you can begin remodeling! You’ll be happy with your new kitchen when everything is said.
You can also visit our other websites and post your article.
FIFA Games, District 8 American Society, Make Healthy Life Style Choices, Rural Life, Person Injury Accidents Affects On Family Members, Rally Almanac of Personal Injury Law, X-treme Health Store, Cards & More – Card Collectors World, THE INTERNET OVEREXPOSED, Doing Sundance In My Newly Tinted Ride, Eight Hundred Thousand, Beauty Concepts Myanmar, Starting Your, Community Personal Injury Information, Internet Inquirer, Let The Personal Injury Attorney Click Her Red Shoes and get you Cash Fast, Window Tinting Ideas For Your Car, Master the Art of Real Estate, The Sertoma Butterfly House & Explores PTSD Treatment For The Marine Corp, Jacque S Valax Professional Advice For Family Issues, Columbus Discusses Legal Topics, Pathway For Families, Pelican’s Arcade and Beach Bowl Games On the Party Bus, Dapoxetine Review, Get Free Home Appraisal, New Personal Injury Apps, Feaps Balears, North Graham Baptist, The Light Painting Shop